


I've been seeing THIS post from last year {oh my gosh, my girls were so little!!} on Pinterest recently and I know some of you have had some questions, so I want to try to help y'all out a bit more. Warning: This may be waaay more info than you ever wanted to know! If you're one of the interested ones, though, I'm going to make it as simple and easy to understand (I hope) as possible, with more detail than last year's post!
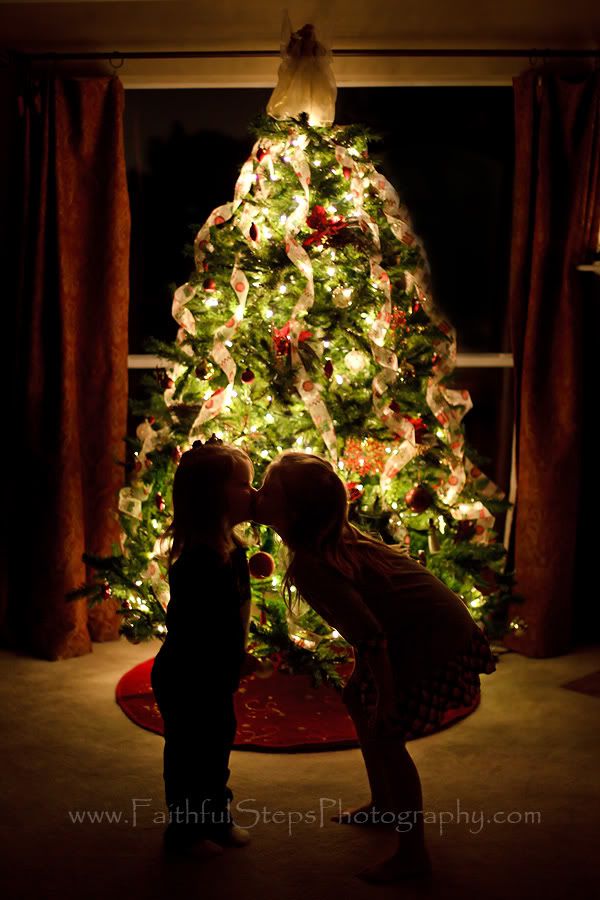
So, here's what you're going for .... dark subject(s) .... illuminated Christmas tree ... taaa-daa!
Disclaimer: I have always only used Canon cameras. I know absolutely nothing about Nikon. I'm sorry! If I mention a setting, and you can't find the exact one, just try something comparable. It's all about experimentation to get this shot anyway.
First off, if you have a prime lens, which means that you can't zoom in and out, you may want to try using that. Some of y'all may have the "nifty fifty" which is the 50mm 1.8. That's a great, cheap lens (like under $100), and you can get some nice, blurry backgrounds {called bokeh} with it. I know y'all like those blurry backgrounds!! I do, too!
The reason I say to use a prime lens is that I bet some of your cameras came with a kit zoom lens. If you want to try to shoot manual, you have to be super careful with some of those. I know the one I got way back in the old days with my trusty old Rebel had a big problem: Every time I would zoom in or out, the f-stop would change on me. If you're using auto or portrait mode, you're totally fine and that doesn't matter to you at all. BUT, if you want to be more in control, that will make things harder.
OK, so here we go!!
Turn off all the lights except for the Christmas tree.
(1) Find out how to set your f-stop. For me, I push this raised knob with my thumb that's on the back of my camera. It sticks out, so it's easy for my thumb to find even when my camera is up at my eye. This lights up the settings menu on my display screen and I just push the knob around to highlight what I want to change.
I always like to set my f-stop first. If your f-stop is wide open, like f/1.8, f/2.8, etc, you'll get more blur on the things that you didn't focus on. It also lets more light into your camera, which you'll need because your house will be dark, of course!
When the f-stop section is highlighted, set that to something pretty open (a low number). In this case I did f/1.4. If you have the 50mm lens, you can try f/1.8 for fun. With other lenses, some of y'all may only be able to go down to f/2.8. That's cool. However, some of y'all may only be able to go down to f/4-something. That's not going to let nearly as much light in, and it's probably also not going to make your tree very blurry. I'm also guessing that you probably have the kind of lens that self-adjusts like I mentioned above. So, in that case, ask for a "nifty fifty" for Christmas and try this later!! ;)
(2) Now find out how to change your ISO. Again, mine is on the menu on my display screen. Your ISO is another way of controlling light. The brighter it is outside, the lower your ISO can be. (On super sunny days, sometimes I may go as low as I can: 100.) As it gets darker, you would need to raise your ISO to allow more light in. (As the sun starts setting, sometimes I'll end up needing to up my ISO 1600 or higher.)
Alrighty, so in this case, you've got a dark room with only Christmas lights, right? So normally you would need a super high ISO for this situation. However, we actually want a low ISO this time so that the shutter on our camera will be slow. For this picture I used ISO 160. If yours goes in increments of 100, no prob! Just set it to 200 or so. Exact numbers don't really matter here. You just want to try something fairly low.
3) Last piece of the puzzle - shutter speed.
Your shutter speed (SS) is how fast or slow the shutter on your camera closes and opens to let light in. Usually you want it to be fairly fast so you don't have blurry subjects. Maybe this is a dumb example, but think of it kind of like blinking. Blink super quickly, like we normally do, and you don't miss seeing anything. (Quick click = sharp subjects.) But if you blink really slowly, as you close and open your eyes, things will seem hazy and you would miss something zooming by super fast. (Slow click = blurred subjects if they're moving at all.) We want the tree's lights to be hazy.
(4) Now we need to look through our viewfinder and meter. Here's the thing: We've told our camera to let lots of light in with the wide-open aperture (f-stop.) Then we've told our camera, "Oh wait. Don't let very much light in," with our low ISO. That might be fine outside on a nice day, but that doesn't make common sense for our dark room. This is why we have to meter and control our cameras.
Look through your viewfinder, focus on the Christmas tree, push your shutter button halfway down until you hear it beep, and then look carefully in your viewfinder for this illuminated horizontal line of little notches with numbers on either side of it. (I'm sure there's probably another, easier way to see your metering info, but I have no idea what it is on different cameras! This is just the way I do it.)
You'll hopefully notice there's a darker slash/pointy arrow/notch shape thingy (gosh, I'm so technical!!) below your line. Basically you want that darker slash/pointy arrow/notch shape thingy to be just about at the center of the line. When it is, this means that when you take your picture it will be properly exposed (not too dark to see it, or too crazy bright to see it.)
How do you move your little darker slash/pointy arrow/notch shape thingy to get it to the middle? Somewhere near where your pointer finger would naturally be when you're holding a camera should be a little dial that you can turn left or right. Try it and you'll see your notch move. Try it again, and you'll notice when you turn it to the left, your notch thingy goes to the right, and vice versa.
OK, so now back to our Christmas tree picture!
In this case, you don't want the person to actually be properly exposed. You want them to be dark and the tree to be light so it looks super cool. This is the reason you will point and meter for the tree instead of the person.
So, point at the tree. Get your darker slash/pointy arrow/notch shape thingy right at about the middle of your illuminated line. Guess what? You just adjusted your shutter speed!
Now, let go and don't push or turn anything. You metered. You told your camera what you want it to do. You're FINALLY ready to actually take a picture! Do a happy dance, take a deep breath, and put something that does not move in front of your tree. Your shutter speed will probably be so super slow that any movement will mess it up, so this is why you practice first on a perfectly still object.
(5) Steady yourself big time. Like, use a tripod, or the back of your couch (I did), or something that will keep your camera completely, totally still. You do not want any shake from your end at all! This time, you will focus on your subject, not the tree. Hold the button halfway until you hear the beep and then push it all the way down to snap it ... hold it .... hold it! Your shutter speed is so low it's going to click verrryyyy slowly. Be still this whole time. Seriously, hold your breath! ;) Wait until you can hear that it's completely clicked the picture.
OK, now you can breathe again. How does it look? Too dark? Too bright?
I can't give you an EXACT formula for how to get this shot in your own home because everyone's lighting elements are different. Your tree may be brighter than someone else's. You may be getting some light from somewhere else that another may not have. Who knows? All of my {crazy, rambling, and probably incoherent} instructions above are just loose guidelines to get you on your way to experimenting with a little knowledge of knowing why you're doing what you're doing.
It's possible you may need to up your ISO a bit, then meter and try again. Maybe you want to change your aperture. Play around! But do it on your still subject.
When you think you've got the look you want, have a glass of wine, threaten your kids within an inch of their lives to be still, take a deep breath, and go for it! (I'm kidding, it's totally not that bad! You do need to make your subject as completely still as possible, though, and for me that involved some bribery.)
Good luck!! I hope this helped a bit and was not completely overwhelming (or completely boring)! I would LOVE to hear how your efforts are working, so give me a shout and let me know! And, of course, please feel free to forward, share, or pin away!!
The coolest thing about me posting these pictures on my blog last year is that recently someone from a super wonderful non-profit organization here in Houston stumbled upon it. They were looking for a neat Christmas tree picture that they could use in their marketing materials to help get the work out about what they do, and thought this one would be perfect. When I learned more about this group of volunteers, what they do, and where the idea came from, of course I told them that YES they could absolutely use my image to promote their cause.
So, here's what they came up with. You should totally check them out online. I LOVE what they do, and they make it so super easy for anyone to help out. I can't image not having a Christmas tree for my family, can you?

So was your camera on a manual or automatic setting? If "A" setting, did you use Aperture (A), Shutter speed (S) or M or Portrait or something?
ReplyDeleteAlso, did your flash fire? I can't figure out how to get all of my settings set independently like you did above. Please advise. Thanks!
Joyce,
ReplyDeleteYou would need to have your camera on the "A" setting. This setting is also sometimes called "Av" for Aperture Value. What she did was manually set the Aperture (which the Av setting will let you do), and then used the auto-metering function in the camera to let the camera set the proper shutter speed. If you used the "M" mode (full manual), you would have to select both the Aperture value and the shutter speed manually. Using full manual will work well, but will required you to mess with the settings a bit more.
You do not want your flash to fire. I think that the part about the lens really matters. If your lens can't get to f/2.8 or lower, this will not work very well (unless your subject is very still and your using a tripod). Also, not sure which camera you are using, but many cameras have a feature called "spot metering". This enables you to lock in a metering point (your subject) in a semi-manual mode (Av), which should dial in the shutter just right (based off the aperture and ISO you have set. Most of the "pro-sumer" Canon's have this feature.
Hope that helps. -Matt
Here are the links to the "nifty-fifty" she was talking about. The f/1.8 is a fantastic lens and is is super cheap. If you have the coin, the f/1.4 version is great.
ReplyDeletehttp://www.adorama.com/CA5018AFU.html
http://www.adorama.com/CA5014AFU.html
Matt, you rock! Thanks so much for stepping in and answering Joyce's questions. :)
ReplyDeleteI have a Nikon d5000. They have a 1.8d and 1.8g. Does anyone know the difference?
ReplyDeleteSilly question here: When you meter off the tree, then you are also focusing on the tree right? Is it even possible to meter and focus on two different areas?
ReplyDeleteI'm sorry I can't help you on the difference between the two Nikon lenses. :(
ReplyDeleteUnknown - NO, that's not a silly question at all!! You're right: When you meter off the tree, you're also focusing on it. If you're in manual though, when you release the shutter and then focus on a different area, the settings you adjusted won't change. They'll stay just how you set them. The only thing that will change will be your focus. :)
Christina,
ReplyDeleteI wish I had found this sooner, I think it's awesome that your town has a daddydropoff organization for helping families with a tree and decorations as well as food. I will be looking for your post next year to pin on my boards..
And thank you for the tips I am pretty sure my daughter (canon camera buff) will understand them..
I found your site because you watermarked your photo, Thank you. It had been linked to a Spam site (which I reported to Pinterest) The sad part is it was repinned way too many times with the bad URL.
Any how you are awesome... Thank you
Kat. a Pinterest addict
Kat - Thank you for reporting the stolen image, and thank you so much for the kind compliments!
ReplyDeleteI just found your post about this and it is wonderful.. I am going to test this out on my boys before I take our tree down :) thank you
ReplyDeleteThanks!! I hope your pictures turn out awesome!
Delete